PRE-REQUISITES
Before migrating your on-premises environment to the AWS Cloud, it’s crucial to consider the following prerequisites:
- Assessment: Start with a comprehensive assessment of your existing application. Determine its readiness for cloud migration by identifying dependencies, requirements, and any security or compliance issues that need to be addressed.
- Choose a Migration Strategy: Select a migration strategy based on the complexity and criticality of the application. Options include rehosting (lift-and-shift), refactoring (modifying the application), or rebuilding (developing a new application).
- Plan and Prepare: Develop a detailed migration plan that includes timelines, required resources, and potential challenges. Set up your AWS account, configure security settings, and establish access controls to ensure a smooth transition.
- Migration: Initiate the migration by replicating the on-premises application to the AWS Cloud. Utilize tools such as AWS Database Migration Service or AWS Server Migration Service to assist with this process.
- Testing: After migration, conduct thorough testing to verify that the application performs correctly in the cloud environment. This includes functional testing, performance testing, and security assessments.
- Optimize: Enhance the application’s performance and efficiency in the cloud by leveraging AWS services like auto-scaling, load balancing, and monitoring tools.
- Cut-over: Complete the migration by transitioning fully to the cloud-based application. Perform post-migration tasks, including decommissioning the on-premises infrastructure and ensuring all systems are operating as expected.
Done with the Prerequisites?
There are concepts you need to understand before proceeding with a migration process:
CREATE A CLOUD INFRASTRUCTURE
Cloud infrastructure encompasses the hardware and software resources that form the foundation of cloud computing. It includes a variety of components such as servers, storage systems, networking equipment, and software applications that are hosted in data centers and accessed over the internet.
The goal of cloud infrastructure is to offer a scalable and flexible computing environment. This setup allows resources to be rapidly allocated or de-allocated based on demand, making it easy for users to scale their infrastructure up or down as needed. Key features of cloud infrastructure include automated management and monitoring, high availability and fault tolerance, and robust security and compliance measures.
Leading cloud infrastructure providers include Amazon Web Services (AWS), Microsoft Azure, and Google Cloud Platform (GCP). These providers offer an extensive array of infrastructure services, including computing power, storage solutions, databases, networking capabilities, and security features. They also provide a range of management and monitoring tools to help users effectively manage their cloud environments.
Provisioning a Virtual Private Cloud (VPC) in AWS
Provisioning a VPC in AWS involves several essential steps:
- Plan Your VPC: Define the IP address range, subnets, routing tables, and security groups for your VPC. Consider your business needs, including the number of subnets, the required availability zones, and the type of connectivity required.
- Create the VPC: Sign in to the AWS Management Console and go to the VPC dashboard. Select the desired region and click “Create VPC.” Input the details you planned in step 1.
- Create Subnets: Create one or more subnets within your VPC, each associated with a specific availability zone in your chosen region.
- Create an Internet Gateway (IGW): Create an Internet Gateway to facilitate communication between your VPC and the Internet.
- Create Route Tables: Set up route tables to manage how traffic is directed within the VPC. Create a public route table for public subnets and a private route table for private subnets.
- Associate Subnets with Route Tables: Link the public subnet to the public route table and the private subnet to the private route table.
- Configure Security Groups: Establish and configure security groups to manage access to instances running within your VPC.
- Connect to the VPC: Set up a VPN connection, use AWS Direct Connect, or AWS Transit Gateway to connect your VPC to your on-premises data center or other networks.
These steps serve as a general guideline for provisioning a VPC in AWS. The actual process may vary based on your organization’s specific needs. Always refer to AWS documentation and best practices for a successful VPC deployment.
Understanding Key Concepts and Their Importance in Provisioning a VPC in AWS:
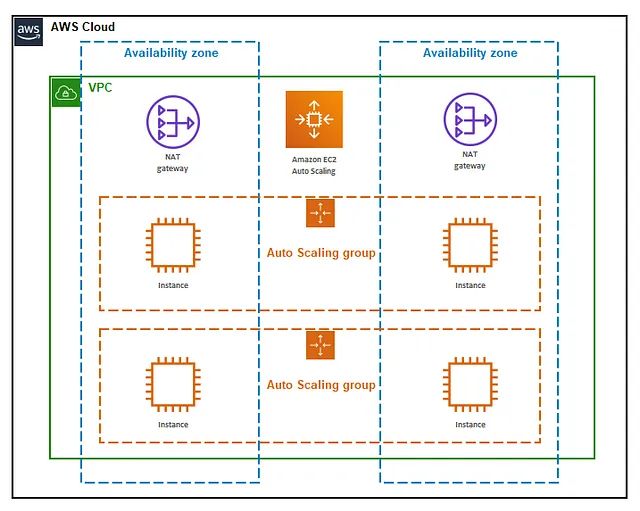
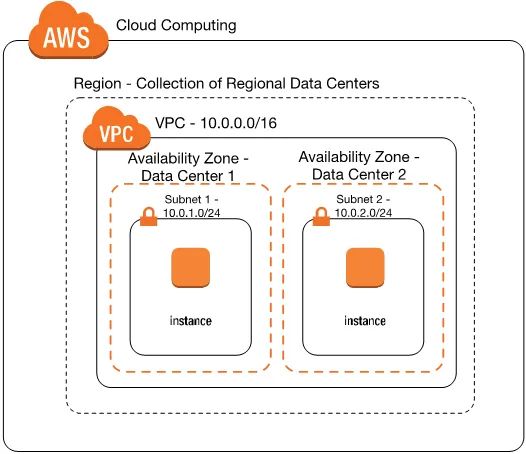
Availability Zones
An availability zone is a distinct data center within a region, designed to be isolated from other zones in terms of power, networking, and infrastructure. Deploying your application across multiple availability zones helps mitigate the risk of zone-specific failures, ensuring higher availability and reliability for your application, even if one or more zones experience issues.
Reasons to Use Different Availability Zones:
- High Availability: Distributing your application across multiple availability zones ensures continuous operation even if one zone fails. This design helps maintain uptime and service continuity by allowing your application to seamlessly run in other zones without disruption.
- Disaster Recovery: By deploying your application in multiple availability zones situated in different geographic regions, you safeguard against data loss and application downtime due to disasters like hurricanes or earthquakes. This geographical redundancy ensures resilience and data protection.
- Improved Performance: Spreading your application across multiple availability zones can enhance performance by reducing latency. Serving requests from the zone closest to the user minimizes delays and speeds up response times.
- Compliance: Regulatory and compliance requirements often necessitate that data be stored across various geographic regions. Utilizing multiple availability zones helps meet these compliance standards and ensures that your data handling practices are aligned with legal and industry regulations.
- Scalability: Multiple availability zones contribute to better scalability by allowing you to distribute incoming traffic and workload across different zones. This distribution helps balance the load, prevent overloading of any single zone, and improves overall system performance and capacity.
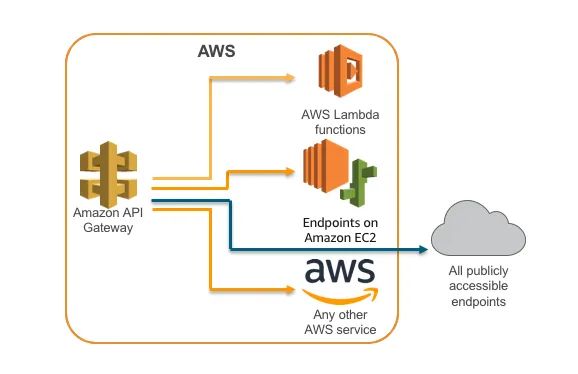
Internet Gateway (IGW)
An Internet Gateway (IGW) is a key component of a VPC that enables communication between resources in your VPC and the internet. It is designed to be horizontally scaled, redundant, and highly available. Here are some common use cases of an Internet Gateway:
- Internet Access for Instances: An IGW provides a route for instances in a public subnet of your VPC to access the internet. This is essential for instances that need to download software updates, access external services, or be accessible from outside the VPC.
- Hosting Public-Facing Services: Use an IGW to enable public-facing services such as web servers or application servers that need to be accessible from the internet. This facilitates direct communication between your VPC and internet users.
- Load Balancers and NAT Gateways: IGWs are often used in conjunction with load balancers and NAT gateways to manage traffic between the internet and your VPC. They help direct external traffic to load balancers and allow internal instances to access the internet through NAT gateways.
- Support for Elastic IP Addresses: IGWs allow instances associated with Elastic IP addresses to communicate with the internet. This is useful for instances that need a static public IP for consistent internet access.
- Internet Access: An Internet Gateway enables resources in your VPC to access the internet. This is useful for applications that require internet connectivity, such as web servers, email servers, and other public-facing services.
- Public-Facing Applications: An Internet Gateway can be used to host public-facing applications such as websites or APIs. These applications can be accessed by users on the internet, while the backend resources remain isolated in the VPC.
- VPN Connectivity: An Internet Gateway can be used to provide secure VPN connectivity between your VPC and on-premises resources. This allows you to extend your on-premises network to the cloud and access resources in the VPC securely.
- Internet-Facing Load Balancing: An Internet Gateway can be used with an Elastic Load Balancer (ELB) to distribute traffic across multiple instances or containers in your VPC. This helps you to build scalable, highly available, and fault-tolerant applications.
- Secure Access to AWS Services: An Internet Gateway can be used to securely access other AWS services, such as Amazon S3, Amazon DynamoDB, and Amazon EC2 instances running outside the VPC.
Subnetting
Subnetting is an important concept in AWS networking that enables you to partition a large IP address space into smaller, more manageable subnets.
Here are some reasons why subnetting is important in AWS:
- Security: Subnetting allows you to implement security policies at the subnet level. By creating subnets and using security groups and network access control lists (ACLs), you can control inbound and outbound traffic to and from your instances.
- Flexibility: Subnetting enables you to design and manage your network infrastructure in a flexible manner. By dividing your IP address space into smaller subnets, you can create a more granular network topology that aligns with your application needs.
- Performance: Subnetting can help improve performance by enabling you to distribute your instances across multiple availability zones (AZs). This can help ensure that your application is highly available and resilient to failures.
- Cost optimization: By using subnets, you can optimize your costs by choosing the appropriate instance types for your applications and deploying them in the appropriate subnets. For example, you can deploy your database instances in a private subnet to improve security and deploy your web servers in a public subnet to ensure accessibility.
- Simplification: Subnetting can help simplify your network infrastructure by enabling you to manage different types of resources in different subnets. This can make it easier to troubleshoot issues, manage security policies, and monitor network performance.
What is CIDR?
CIDR stands for Classless Inter-Domain Routing, which is a method of IP address allocation and subnetting used to create smaller network segments. It is a more efficient way of allocating IP addresses than the traditional classful addressing method.
CIDR notation is used to represent IP addresses and subnet masks. The notation consists of an IP address followed by a slash (/) and a number that represents the number of bits in the network prefix. For example, 192.168.1.0/24 represents a network with a prefix of 24 bits, which means the first 24 bits of the IP address are used to identify the network, and the remaining 8 bits are used to identify the hosts within the network.
CIDR blocks are used to allocate IP addresses to different networks. A CIDR block is a range of IP addresses that have the same network prefix. For example, the CIDR block 192.168.0.0/16 represents all IP addresses in the range 192.168.0.0 to 192.168.255.255.
CIDR blocks are commonly used in cloud computing and network virtualization to allocate IP addresses to virtual networks and instances. They enable efficient use of IP addresses and simplify network management by grouping related resources together.
Steps to create subnets in the AWS console for a VPC:
- Log in to your AWS Management Console.
- Navigate to the Amazon VPC service.
- Click on “Subnets” in the left-hand navigation menu.
- Click on the “Create subnet” button.
- Choose the VPC for which you want to create the subnet.
- Choose the availability zone in which you want to create the subnet.
- Enter a name for the subnet and a CIDR block that is a subset of the VPC’s CIDR block.
- Click on the “Create” button to create the subnet.
Repeat the above steps to create additional subnets within the VPC. You can create subnets in different availability zones to ensure high availability and fault tolerance for your application. Once you have created the subnets, you can launch resources such as EC2 instances and RDS instances within the subnets to host your application.
Provisioning EC2 Instance that will serve as the virtual machine for the migration:
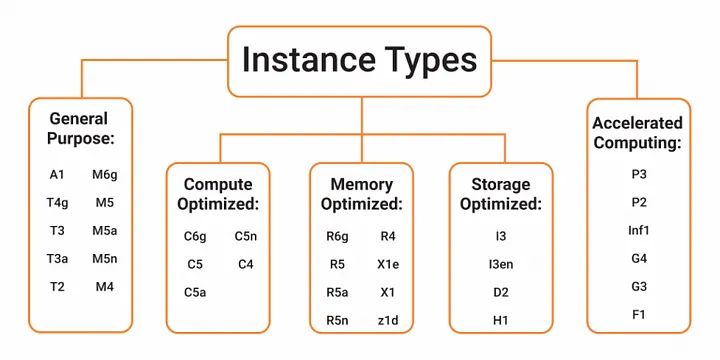
EC2 instances are a fundamental component of the AWS cloud computing platform and can be used for a variety of purposes in a migration project. You select the type of instance depending on your project needs. Here are the various types of instances.
Here are some of the ways in which EC2 instances can be used during a migration:
- Application hosting: EC2 instances can be used to host applications that are being migrated from an on-premises environment to the cloud. This allows organizations to run their applications on a scalable, flexible infrastructure that can accommodate changing workloads and traffic patterns.
- Data processing: EC2 instances can be used to perform data processing tasks such as data analysis or transformation. This can be especially useful in a migration project where data needs to be cleaned, transformed, or restructured before being moved to the cloud.
- Database hosting: EC2 instances can be used to host databases that are being migrated to the cloud. This allows organizations to run their databases on a scalable, managed infrastructure that can provide better performance and availability than an on-premises database.
- Testing and development: EC2 instances can be used for testing and development purposes, allowing organizations to test their applications in a cloud environment before deploying them to production
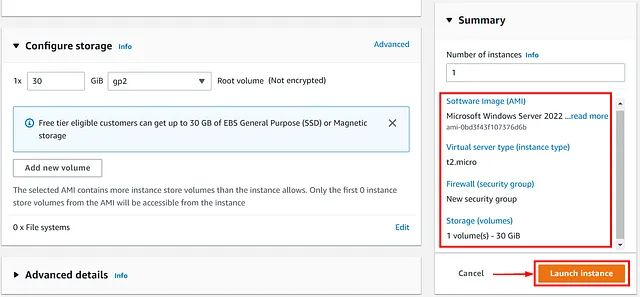
Steps in Provisioning EC2 instance in AWS console:
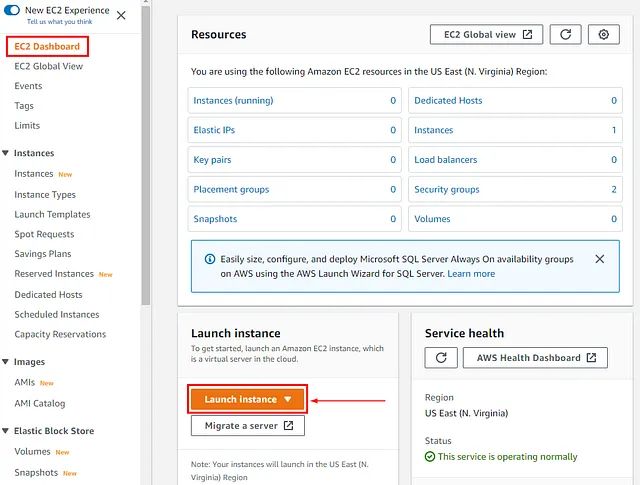
- Log in to the AWS Management Console.
- Click on the “Services” dropdown menu and select “EC2” under the “Compute” section.
- Click the “Launch Instance” button to start creating a new EC2 instance.
- Choose an Amazon Machine Image (AMI) for your instance. You can select from a range of pre-configured AMIs, including different operating systems and software configurations. For example, you might choose an Ubuntu AMI for a Linux-based server.
- Choose an instance type. This determines the hardware resources, such as CPU, memory, and network capacity, that are allocated to your instance. You can choose from a range of instance types depending on your requirements.
- Configure your instance details. This includes selecting the VPC and subnet that you want to launch the instance in, as well as any additional configuration options like the IAM role, user data, or advanced network settings.
- Add storage to your instance. You can choose the type and size of storage volume you need for your instance.
- Configure security groups. This defines the network traffic rules that control inbound and outbound traffic to your instance. For example, you might open up port 80 to allow HTTP traffic to your web server.
- Review your instance details and configuration settings.
- Launch your instance.
Creating Cloud Database for Migration:
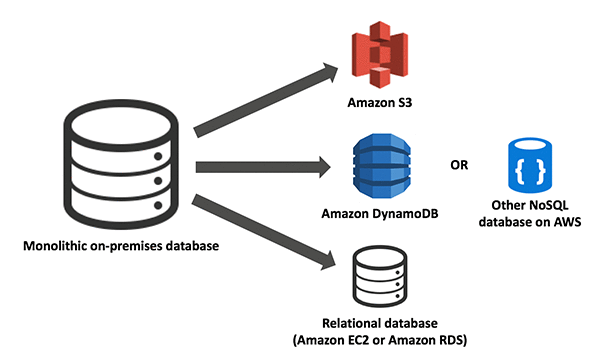
Cloud Databases
Cloud databases are essential for migrating from on-premises infrastructure to the cloud, offering scalable and flexible storage solutions. Here are key benefits of using cloud databases:
- Scalability: Cloud databases can easily scale up or down based on changing demands. This flexibility ensures that your database can handle varying workloads without manual intervention or over-provisioning.
- Cost-effectiveness: By using cloud databases, you avoid the upfront costs of purchasing and maintaining physical hardware. Cloud databases typically follow a pay-as-you-go model, meaning you only pay for the resources you use, which can lead to significant cost savings.
- Accessibility: Cloud databases are accessible from anywhere with an internet connection. This accessibility is particularly beneficial for teams that are geographically dispersed, allowing for seamless data access and collaboration.
- Security: Cloud databases often come with robust security features, including encryption, access controls, and automated backups. These features help protect your data from unauthorized access, loss, or corruption.
Steps to Create an AWS Database for Migration
- Choose the Database Engine: Select the appropriate database engine that aligns with your application requirements. AWS offers various database engines, such as Amazon Aurora, MySQL, PostgreSQL, Oracle, and Microsoft SQL Server.
- Launch the Database Instance: Create a new database instance in the AWS cloud. This can be done via the AWS Management Console, CLI, or SDKs.
- Configure the Database Instance: Set up the database instance by specifying parameters like the engine version, instance class, storage capacity, and any additional settings required for your deployment.
- Create a Database: Within your database instance, create a new database using your preferred database management tool (e.g., SQL Workbench, pgAdmin).
- Migrate Data: Transfer data from your on-premises database to the new cloud database. Utilize AWS Database Migration Service (DMS) or other migration tools for this process.
- Test the Database: Perform testing to ensure the database operates correctly in the cloud environment. Check for data integrity, run queries, and validate performance.
- Deploy the Application: Update your application to connect to the new cloud database. This may require adjustments to application configurations or code.
Steps to Create an RDS with MySQL in AWS
- Log in to AWS Management Console: Access your AWS account and navigate to the Amazon RDS service.
- Create Database: Click on “Create Database” and select the MySQL database engine.
- Choose Engine Version: Select the MySQL version you wish to use (e.g., MySQL 8.0).
- Select Use Case: Choose a use case that best fits your needs (e.g., production, development).
- Choose DB Instance Class: Define the instance class that specifies the compute and memory resources for your database.
- Specify Database Settings: Provide a DB instance identifier, master username, and password.
- Select Storage Type: Choose the storage type and size for your database instance.
- Configure Instance: Set up options for high availability, backups, and monitoring.
- Select VPC and Subnets: Choose the VPC and subnets for your RDS instance deployment.
- Configure Security Groups: Define security group settings to control access to the RDS instance.
- Review and Create: Review your configuration settings and click “Create Database” to launch your RDS instance.
- Connect to Database: After creation, connect to the RDS instance using your database management tool or application.
Steps to Migrate Data from On-Premises to Cloud
- Log in to AWS Management Console: Access the AWS Management Console and navigate to Database Migration Service (DMS).
- Create Replication Instance: Set up a new replication instance to handle the data migration tasks.
- Create Source Endpoint: Provide the connection details for your on-premises database, including database type, hostname, port, and authentication credentials.
- Create Target Endpoint: Provide the connection details for your cloud database, including database type, hostname, port, and authentication credentials.
- Create Migration Task: Define a new migration task, specifying source and target endpoints and the replication instance to use.
- Start Migration Task: Initiate the migration process to copy data from the on-premises database to the cloud database.
- Monitor Migration: Track the progress of the migration task in the DMS console, checking for errors and verifying data transfer.
- Complete Migration: Once migration is complete, finalize the process by stopping the task and validating the data in the cloud database.
Configuration of Application and Dependencies
- Update Configuration Files: Modify application configuration files to use the new cloud resources, including updated IP addresses and DNS names for cloud databases and storage.
- Install Dependencies: Ensure all required libraries, frameworks, and runtimes are installed. Use appropriate package managers for installation.
- Test Applications: Conduct thorough testing to verify that the application functions correctly with the new cloud resources.
- Monitor Applications: Implement monitoring using tools like AWS CloudWatch to track application performance, including CPU usage, memory, and network traffic.
- Troubleshoot Issues: Address any issues that arise during testing and deployment to ensure smooth operation.
Testing the Application
- Functional Testing: Verify that all application functions work as intended.
- Performance Testing: Assess the application’s performance under various load conditions.
- Load Testing: Test the application’s capacity to handle high traffic volumes.
- Security Testing: Check for vulnerabilities and ensure data protection.
Deploy the Application
- Use Deployment Tools: Employ continuous delivery tools like AWS CodePipeline, Jenkins, or GitLab CI/CD to automate the deployment process.
- Set Up Instances: Create and configure EC2 instances or containers, install dependencies, and launch the application.
- Configure Load Balancing: Implement load balancing and auto-scaling to handle traffic and ensure availability.
- Monitor Post-Deployment: Use monitoring tools to keep track of application performance and address any issues.
Monitor Application Performance
- Use Monitoring Tools: Employ tools such as AWS CloudWatch or Datadog to monitor key metrics, including CPU, memory, and network performance.
- Set Up Alerts: Configure alerts using AWS SNS or other notification services to proactively address potential issues.
- Review and Optimize: Regularly review application performance, analyze logs, and optimize settings for efficiency.
Conclusion
Migrating applications and databases to the cloud provides a range of benefits, including scalability, cost-effectiveness, accessibility, and enhanced security. By leveraging cloud databases, you can achieve a flexible storage solution that adjusts to your changing needs and reduces the need for costly on-premises hardware.
The migration process involves several key steps:
- Creating an AWS Database: Choose the appropriate database engine, launch and configure the database instance, create the database, and migrate data using AWS Database Migration Service (DMS). This ensures that your data is accurately transferred and that the new database is correctly set up.
- Configuring and Deploying Applications: After setting up your cloud database, update application configurations, install necessary dependencies, and thoroughly test the application. This step ensures that your applications are properly aligned with the new cloud resources and function as expected.
- Monitoring and Optimization: Post-deployment, it’s crucial to monitor application performance using tools like AWS CloudWatch. Set up alerts to detect issues early and periodically review performance metrics to optimize application efficiency and reliability.
- By admin